Howdy!
This was a fun experience, and I had to share for all who are interested. :) (sorry I didn't take more pictures, I only snapped some after I was done pouring it because I wanted to make sure I got EVERYTHING right)
I first began my soaping journey back in November 2009. I was really interested in making my own soap (from scratch), but was soooooo afraid of working with lye (because it can burn you!)... So up until today, I had only created soap using melt-and-pour techniques and rebatching techniques. This was a great way for me to get my feet wet. But it left me hungry for more...
Fast forward to today... I created my first batch of soap from scratch! Here's a quick play-by-play of what I did...
First, I had to decide on a recipe. I used The Everything Soapmaking Book by Alicia Grosso. This is a great book with TONS of useful information on how to make soap. I decided to make my soap from olive oil, coconut oil, palm oil, castor oil, water, lye, and oatmeal, milk, and honey fragrance oil. I decided to use my 4 pound mold.
Second, I measured EVERYTHING out. Then I took my water and my lye in two separate containers out to my porch to mix. This is supposed to be done in a well ventilated area because the fumes are caustic, and since I have two curious cats, I thought outside would be best! I mixed them together and left them outside to cool (the mixture was about 190 degrees!) while continuing to heat up my oils. I know you aren't supposed to breathe the fumes in, but I accidently did (and my face wasn't even near the mix!)... OOPS!
When the lye water and oils were within 10 degrees of each other, I mixed them together and used a stick blender to speed up the process. Then when the mix got to trace, I added my fragrance. (I decided to forgo colorants this first time just to see how the process worked).
I then poured into my 4 pound mold (don't you LOVE the little swirlies on top? Sadly, they didn't make it through):
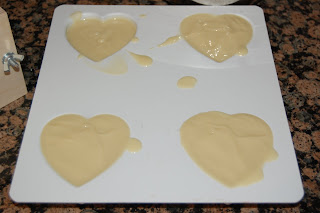
And I had a TON left over! So I quickly pulled out this mold:
Then I wrapped them up and set them aside. I checked on them 10 minutes later and found GEL PHASE!!! I freaked out thinking I had done something wrong... It turns out gel phase is good!
And
I wrapped them back up and set them aside again. While my soap was curing, I decided to clean up the kitchen (i.e. the 3 bowls, 1 pyrex measuring cup, stick blender, wooden spatula, and thermometer). Yes, it was a BIG mess. I filled all the bowls with water and let them sit for 10-20 minutes and then started washing them. BY HAND. WITHOUT GLOVES. BIG MISTAKE. I thought that because the lye and oils were mixing, it was safe for me to touch. Apparently it didn't cross my mind that there was still lye in some of the containers. My hands got SLIGHT burns that looks nothing more than a rash (so don't worry mom!). But my hands are crackly dry. AND THEY HURT. So I learned that I should wear my dishwashing gloves next time I clean everything up (just to be safe-which I wasn't this time). And you can bet I'm not going to touch the soap without my gloves on...
I checked on my soap again 5 hours later and they look like this:
And
WooHoo! It looks like my soaps survived gel phase! :-D I can't wait to cut them up and see what they are going to look like! I'll keep everyone updated and I PROMISE to take pictures when I cut them. :-)
Monday, April 11, 2011
Subscribe to:
Post Comments (Atom)


No comments:
Post a Comment