About two weeks ago now (I know, I'm a little behind!), I received my box of soap goodies from the Bramble Berry soap swap. To participate, you had to make 12 bars of soap and select either the cold process group, or the melt and pour group. Since I didn't have time to do CP (and since I had only done CP once before), I decided to participate in the melt and pour group. :)
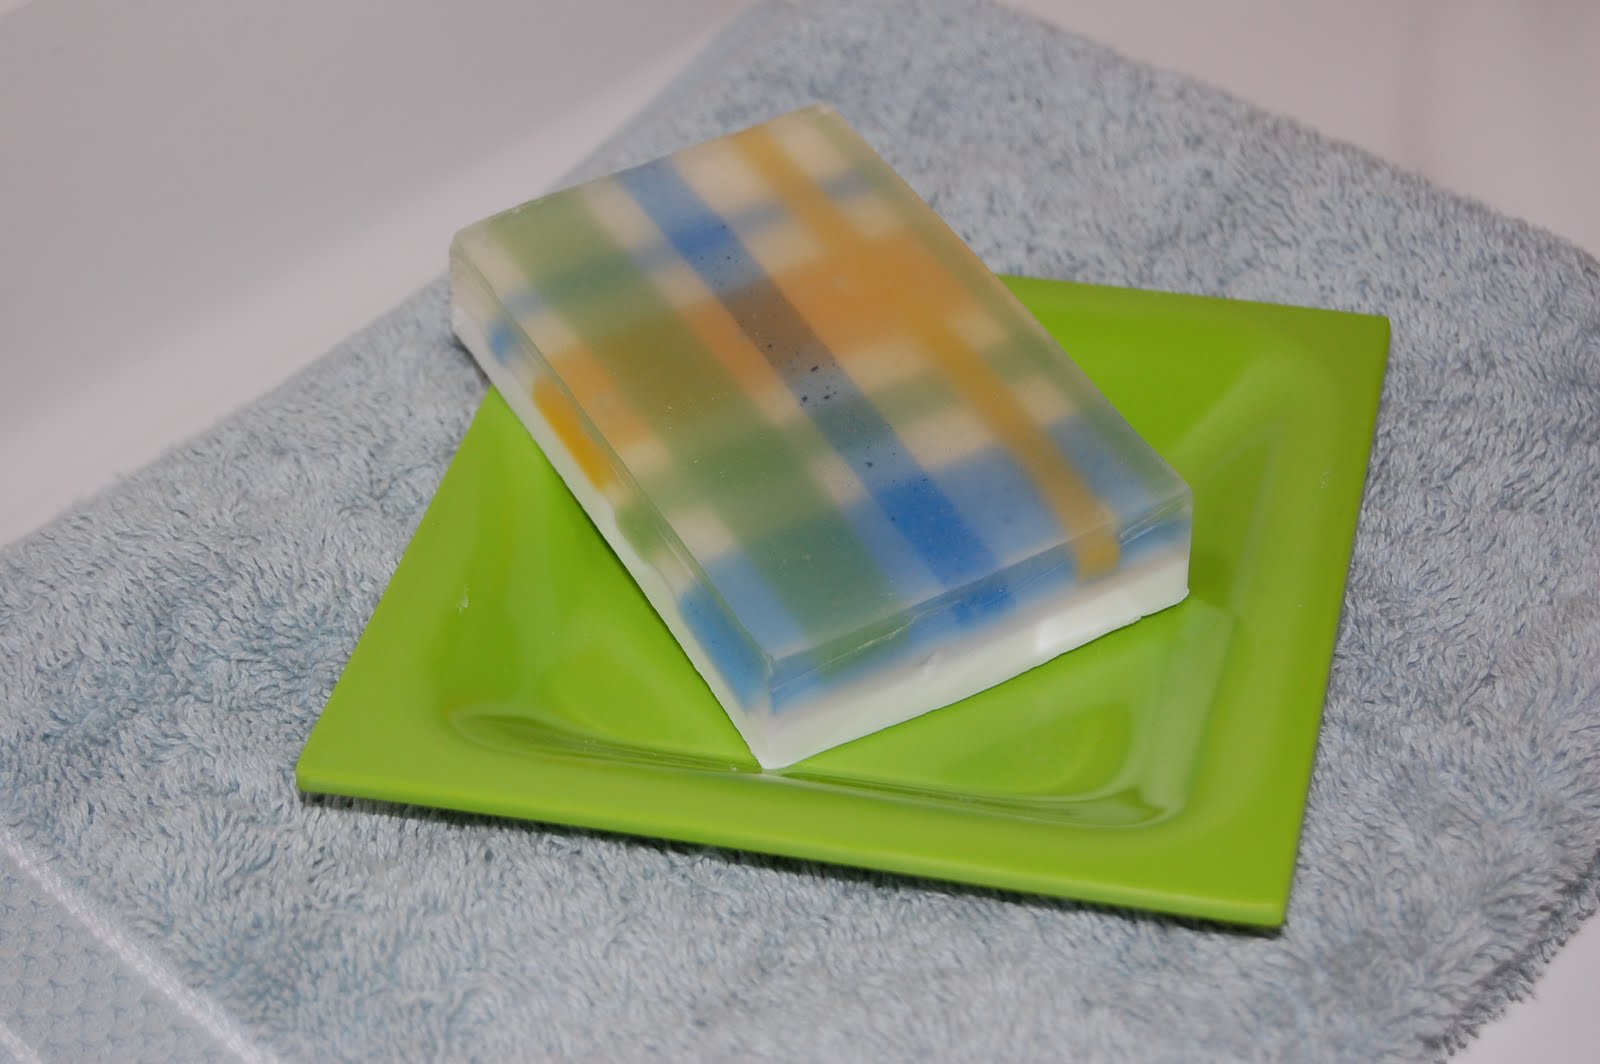
Here are the soaps that I sent off for my entry. They are "grass stain" scented, which smells exactly like its namesake: freshly cut grass!
Here are the 12 soaps I received in return from my fellow swappers!!! My favorite part was being able to smell new fragrances I've never used before!
I want to share where they came from, so I will start from the left top and go down each row. If you made one of these bars and have a website, please let me know and I will link you!
The first soap tied with the pink see through ribbon was from Donna's Creations and was Pineapple Cilantro scented.
The soap just below it looks like a dragon and was also from Donna's Creations. This soap was Basil Lime scented.
The soap in the bottom left corner was made by Alea Hunsucker for Lee Lee's Lounge. This soap was Saffron and Honey scented.
Back to the top row, there is a slice of cheesecake soap made by Kimberly Burton for Soap and Suds. This soap was Buttercream and Snickerdoodle scented.
Next to the cheesecake is a cupcake soap also made by Kimberly Burton for Soap and Suds. This soap was Clementine Cupcake scented.
Below that is a soap in white paper with a red ribbon around it. This soap was made by Blushing Rose Handmade Soaps and the packaging says Mr. Darcy Soap on it. I'm not sure of the fragrance.
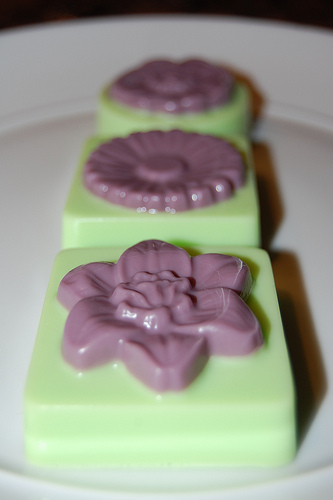
The little green flower at the bottom came from Soap Bauble. It was unmarked so I'm not sure what fragrance it is.
Back at the top next to the cupcake is by Soap and Suds and is Island Coconut scented.
Below that is a clear bar of soap with what appears to be a knight chess piece inside. It has no name, fragrance, or ingredients on the packaging so I have NO idea where it came from!
At the bottom, you will see an Anise essential oil cold process soap made by Otion's Katheryn Hackney. I was rather surprised to receive this bar since I was in the melt and pour group! It made for a nice surprise and this was the first and only fragrance I smelled as soon as I opened the box. Very strong smelling. :)
To the far right of the photo, you will see a sandal on top of what I believe is a wooden soap dish. This was my very favorite of the group, just perfect for summer. :) It was created by Christy's Creations and is raspberry and violet scented.
In the very bottom right corner, I have a soap made by Lisa Burton for Soap and Suds. It is Passionfruit Rose scented.
I look forward to the next soap swap Bramble Berry puts on and I encourage everyone I know who makes soap to participate! :-D
Friday, May 20, 2011
Wednesday, April 13, 2011
Out comes the soap!
Remember my post on Monday when I made my first batch of cold process soap? FINALLY, 48 hours has passed and it was time to remove the soap from the molds!
I honestly had no idea what to expect when I took them out, I was just hoping it wasn't a complete disaster. I knew it had gone through gel phase, and I just prayed the entire mold had gone through it so I wouldn't get weird lines or discoloration...
As I started peeling the tape and pulling the paper up out of the mold, I got the most GIDDY feeling. EVER. It was SOOOOOO EXCITING!!!!! I cannot even BEGIN to tell you guys how awesome I felt knowing that I made this with oils, water, and lye!
First out were the hearts. I know they are a little "rough around the edges." I plan on probably cutting the excess off to make them prettier.
Then I pulled out this guy. The weird lines on the side are from my freezer paper. I didn't get it flush against the wood, but it's ok. It just makes it look that much more home made. ;)
Then I got REALLY EXCITED! Time to make my first cut! NO discoloration! No weird lines! No lye crystals! No soda ash! YAY!!!!
I was able to cut the whole 4 pound log into 16 bars of soap!
Here they all are on the drying rack! This is going to be their new home for the next 4-6 weeks. I plan or removing the wax paper the soap is sitting on in a day or two. I just don't want little squares in the bottom of my soap bars. ;-)
And another view:
OMG, I think I might become a soapmaking freak! I can't wait to make my second batch! I'm just sad I'll have to wait a few weeks because of all these trips I have planned! :(
If you are in my family, you may be receiving a little bar of soap from me in the next month! I'm proud to say I actually MADE these. FOR REALZ YO. :-D
Monday, April 11, 2011
My first cold process experience!
Howdy!
This was a fun experience, and I had to share for all who are interested. :) (sorry I didn't take more pictures, I only snapped some after I was done pouring it because I wanted to make sure I got EVERYTHING right)
I first began my soaping journey back in November 2009. I was really interested in making my own soap (from scratch), but was soooooo afraid of working with lye (because it can burn you!)... So up until today, I had only created soap using melt-and-pour techniques and rebatching techniques. This was a great way for me to get my feet wet. But it left me hungry for more...
Fast forward to today... I created my first batch of soap from scratch! Here's a quick play-by-play of what I did...
First, I had to decide on a recipe. I used The Everything Soapmaking Book by Alicia Grosso. This is a great book with TONS of useful information on how to make soap. I decided to make my soap from olive oil, coconut oil, palm oil, castor oil, water, lye, and oatmeal, milk, and honey fragrance oil. I decided to use my 4 pound mold.
Second, I measured EVERYTHING out. Then I took my water and my lye in two separate containers out to my porch to mix. This is supposed to be done in a well ventilated area because the fumes are caustic, and since I have two curious cats, I thought outside would be best! I mixed them together and left them outside to cool (the mixture was about 190 degrees!) while continuing to heat up my oils. I know you aren't supposed to breathe the fumes in, but I accidently did (and my face wasn't even near the mix!)... OOPS!
When the lye water and oils were within 10 degrees of each other, I mixed them together and used a stick blender to speed up the process. Then when the mix got to trace, I added my fragrance. (I decided to forgo colorants this first time just to see how the process worked).
I then poured into my 4 pound mold (don't you LOVE the little swirlies on top? Sadly, they didn't make it through):
And I had a TON left over! So I quickly pulled out this mold:
Then I wrapped them up and set them aside. I checked on them 10 minutes later and found GEL PHASE!!! I freaked out thinking I had done something wrong... It turns out gel phase is good!
And
I wrapped them back up and set them aside again. While my soap was curing, I decided to clean up the kitchen (i.e. the 3 bowls, 1 pyrex measuring cup, stick blender, wooden spatula, and thermometer). Yes, it was a BIG mess. I filled all the bowls with water and let them sit for 10-20 minutes and then started washing them. BY HAND. WITHOUT GLOVES. BIG MISTAKE. I thought that because the lye and oils were mixing, it was safe for me to touch. Apparently it didn't cross my mind that there was still lye in some of the containers. My hands got SLIGHT burns that looks nothing more than a rash (so don't worry mom!). But my hands are crackly dry. AND THEY HURT. So I learned that I should wear my dishwashing gloves next time I clean everything up (just to be safe-which I wasn't this time). And you can bet I'm not going to touch the soap without my gloves on...
I checked on my soap again 5 hours later and they look like this:
And
WooHoo! It looks like my soaps survived gel phase! :-D I can't wait to cut them up and see what they are going to look like! I'll keep everyone updated and I PROMISE to take pictures when I cut them. :-)
Monday, March 21, 2011
Hibernating for the winter
Hello everyone!
As many of you may have noticed, there hasn't been a whole lot of soaping going on around here lately. I'd like to say I was hibernating for the winter... (It is extremely difficult for me to get motivated when the days are short and it's freeeeeeezing cold outside!) Now that spring is finally here, I'm going to start up with my crafting again!
I have quite a few new exciting things in the works, including two new soap lines that I'm working on (in my head at the moment)! I'm hoping to get one of my new lines in a local store when everything is all completed... *fingers crossed*
I am also participating in the Brambleberry Soap Swap that is taking place in the next month and a half... I'm signed up for the melt-and-pour group for now since I've never tried cold process... I'd love to encourage others to sign up for the swap as well! All the rules are on the Soap Queen blog at this link.
I'm getting really amped up about finally trying my hands at cold process soap. It has been something I've wanted to try since I first got into soap-making back in November of 2009 but I was afraid to work with lye... I've finally "manned" up and I'm ready to dive right in! I'm pretty busy this coming week (with marathon training and Sweet Adelines competition this weekend!), but hopefully in the next week or so I'd like to make my first batch! I'll take pictures and post them once I actually try it!
Thanks for stopping by!
Cassandra :)
Friday, May 14, 2010
BOGO special: 2 soaps for $3.00!!!
I currently have 6 soap bars remaining in my BOGO special going on over on my etsy page! The soaps remaining are:
I am still offering my "OOPSY" items at 50% off through paypal. I have 6 bars of celestial waters scented soap (approx. 2.5" x 3") for sale and 3 rosemary mint scented bath fizzies (approx. 2.25" diameter) (Pics in this post). The price breakdown is as follows:
'oopsy soap' - $2 each
Japanese lotus blossom
Berry wine
Vanilla
Sweet pea
Jasmine
Green apple
BOGO SALE INFORMATION: Purchase any bar of soap listed above from my sale page on etsy and receive an additional bar absolutely free! You will need to provide me with your top 3 choices for your free bar from the options below when submitting your order and I will do my best to accommodate your first choice. It's on a first-come first-served basis.
Japanese lotus blossom
Green apple
Lemon verbena
Lilac
Pink grapefruit
English rose
Peppermint eucalyptus
Japanese lotus blossom
Green apple
Lemon verbena
Lilac
Pink grapefruit
English rose
Peppermint eucalyptus
I am still offering my "OOPSY" items at 50% off through paypal. I have 6 bars of celestial waters scented soap (approx. 2.5" x 3") for sale and 3 rosemary mint scented bath fizzies (approx. 2.25" diameter) (Pics in this post). The price breakdown is as follows:
'oopsy soap' - $2 each
'oopsy bath fizzies' - $1.75 each
Shipping and packaging for 1 "oopsy" item: $2
Shipping and packaging for 2 or more "oopsy" items: $3
Send payment to me via paypal: cass_jupiter@yahoo.com. Please specify which items you are purchasing when ordering so I know what to send. ;-)
I made English rose scented bath fizzies yesterday and I'm going to finish up a batch of soap tomorrow. I think it's going to look really cool when I'm done with it. Pictures to follow once they are completed!
Wednesday, May 12, 2010
Current items for sale
Today, May 13 is the final day for all listings on my original etsy page located here. All 4 soap bars listed there are 50% off, or $2.00 each because the listings are expiring! This is a great deal for handmade soap! Head on over there right away!
Also, my current etsy page has a sale going on as well, 25% off all large single colored soap bars (these listings will be expiring in the next few days as well, hence the sale).
If you read my previous post (or at least looked at the pictures), I am offering my "OOPSY" items at 50% off through my paypal. I currently have 6 bars of celestial waters scented soap (approx. 2.5" x 3") for sale and 3 rosemary mint scented bath fizzies (approx. 2.25" diameter) (see previous post for pics). The price breakdown is as follows:
"oopsy soap" - $2 each
"oopsy bath fizzies" - $1.75 each
Shipping and packaging for 1 item: $2
Shipping and packaging for 2 or more items: $3
You can send payment to me via paypal: cass_jupiter@yahoo.com
Please specify which items you are interested in purchasing when you submit your payment through paypal. Thanks! :-D
Sunday, May 9, 2010
Things don't always turn out right...
First of all I want to say Happy Mother's day to all you awesome mom's out there! I hope everyone had a really special day. :-D
Ok, so the purpose of this post is to show that I am NOT perfect by any means and in my soap-making mishaps do happen. I usually try to hide them because I am a "perfectionist" and mistakes are UBER embarrassing to me... I was tempted to hide this one from the world but I figured I can grow from this as a soap-maker and as a person. I'm accepting the fact that sometimes things that happen are out of my control. When things go wrong, we can learn from them and try to make sure it doesn't happen again!
So what went wrong you ask?!? Well, I'll tell you. When I started my soap-making back in November of 2009, I used the little liquid dyes from Hobby Lobby for coloring my soaps. This worked great! Then I started making soaps with two colors (i.e. some of my molds had flowers on the top so I'd make the flower one color and the body another). This worked great! Until I looked in my cabinet where I keep my finished soaps and realized the colors were meshing together and making a new color! And it wasn't a pretty color, it was usually brown or some other gross color. YUCK!
So after doing some research, I came across other ways to color my soap by using oxides and micas! These are non-bleeding pigments so they work perfectly for two-toned soaps! No more brown blah color! So I used some oxides in my soap and they turned out great! Then I decided to try some micas to color my soaps. They leave the soap a semi-opaque color of the mica you used with a really cool shimmery look! In the picture below, I used Brambleberry's super blue mica and lavender mica to color my clear soap then cut them into strips. Then I poured the clear soap and set the strips, let that dry, then made a light purple color for the final bottom layer. I cut them and here is how they looked:
They aren't the prettiest soaps ever, but I thought they looked ok, right?!? Oh, I forgot to mention the glitter! I love that little glittery shine. :) This was my first time using glitter and I might become a glittery soap fanatic now. hehe ;-) Anyway, I cut the soaps and covered them in saran wrap and let them sit on my counter. About 4 days later, I looked at them and they looked like this:
OH MY GOSH!!!! I couldn't believe my soaps turned into this! They weren't too pretty to begin with but this way they look DISEASED!!! I felt like this project was a failure. WAAAAH. I contacted Anne-Marie from Brambleberry (who is the nicest and most helpful person EVER!) and asked why this happened. She told me that when soaps with mica are placed in direct sunlight, they will fade like this (unless you use a UV inhibitor, which is like sunscreen for your soap!). The STRANGE part was that these soaps were nowhere NEAR the sun! I guess the lights in my kitchen must be very strong and mimic the sun. Oh well, not really much I can do about it now.
SO... I've decided to offer these "OOPSY" soaps at half price (ONLY $2!!) if anyone is interested in purchasing them. There is nothing wrong with them, they are just faded but they do smell great (celestial waters fragrance)! Here is the fragrance description: "This is not an oceanic scent but more of a sweet mountain spring scent. Imagine a hike on the banks of a babbling brook through the Appalachians, with the sweet clean scent of hemlock, magnolia, and honeysuckle lingering in the air."
If you would like to purchase one or more of these soaps, Please send payment ($2 per bar with $2 shipping/packaging charges ($3 shipping for two or more soaps)) to my paypal account: cass_jupiter@yahoo.com
Oh, and there was another oopsy that happened... I made my second batch of bath fizzies and apparently the mixture was too moist. They immediately started flattening out on the bottom so I re-molded them and took off the top half of the bubble and left the bottom half on so it wouldn't flatten out again. Then the top half proceeded to "grow" so they turned out looking like acorns. (the bottom in the picture was actually the top which mushroomed out)
So because these turned out "acorn shaped," I will also offer these at half price too! They are rosemary-mint scented with a slight green color to them because I added some dye to them. :) If you would like to purchase these, they are available for $1.75 each and the shipping/packaging charges will be $2 for one or $3 for two or more. You can mix and match these with the "imperfect" soaps above if you'd like! You would send payment to my paypal: cass_jupiter@yahoo.com
Ingredients for the bath fizzies: Sodium bicarbonate, citric acid, sweet almond oil, water, rosemary mint fragrance, and yellow and blue dye
Also: All soaps on my original etsy are now 50% off until May 13 when the listings expire! Only $2 per soap! Check them out!
You can check out my milehighbodycare etsy page for 25% off all large single color soaps!
Have a great night everyone. :-D
Monday, May 3, 2010
New items listed on my etsy!
Hey everyone! Remember that post last week where I gave a preview of my "plaid soap?" Well I cut it and it's for sale now on my etsy page! Below is a plumeria scented soap which smells EXACTLY like your favorite plumeria products from Bath and Body Works. They may have discontinued it but you can now buy it from me in the form of an adorable plaid soap! :)
Since I had extra stripes left over after creating the soap above, I decided to make a new color and create a slightly different look! This one is honeysuckle scented, it smells yummy, and it looks so darn cute!

Last week I also made lavender scented bath fizzies. The smell is strong, but lavender has relaxing properties which is perfect for a bath when you are TRYING to relax! Drop it in your tub and watch it fizz! They contain sweet almond oil which is an excellent natural moisturizer, and has been known to soften the skin! So you get a great smelling bath AND soft skin when you're done! Who could ask for anything more?!? ;)
If you buy these bath fizzies off of my etsy page, this is what they'll look like when they arrive at your home! They would make a great gift for that special someone in your life (or you!!) who is stressed out all the time and needs to relax. We ALL know someone like this, right?
By the way: ALL single colored large soaps are STILL 25% off on my etsy sale page! They were originally $4 and are now $3! The listings will be expiring in 15 days, so don't let these soaps get away! ALSO: my original etsy page found here is also having a 25% off sale. These listings will be expiring in 10 days! Don't miss out!
Thank you for being a friend... :-)
Tuesday, April 27, 2010
Wedding soap preview!
Ok, so I have been a BUSY BUSY bee working these past FIVE (YES, FIVE!) days on my wedding soaps! My internet presence has been lacking lately (I guess that's a good thing since I'm on my computer 14+ hrs. a day) I feel like this has become a full-time job! I wake up, run, shower, then get into the kitchen and start cooking soaps until the wee hours of the morning! Here is a small preview (of course I'm not going to show the finished product, I don't want people to see them before the wedding! And if you think you know what it is, keep it to yourself!).
I started working on these last Wed. Below are parts 1 and 2:
I cannot show step 3 because this is when the magic happened... Below is step 4, the final step (and step 4 took me 4 days to complete! Oye, it was the most time consuming part) and voila! They are finished!!! (BTW: That's my new loaf mold in the pic. that came last week! I L-O-V-E it! It's 12" x 3" x 3.5" and it's going to make for some fun future soap projects!)
Below is another fun little soap I've been working on for the past 3 or 4 days. This one is an 8" x 8" square (shown below) that I made and it needs to be cut down into smaller pieces (which I'll do tomorrow because the STUPID Fed Ex guy who I mentioned in my last post left my supply box in the office! GRRR). Once I cut this block down, I'm going to offer these for sale on my etsy page! Did I mention it's plumeria scented? YUM.
Okie dokie, I'm gonna hit some hay now. It was a long and laborious day of soap-making and I am exhausted. ;)
Wednesday, April 21, 2010
Today was like Christmas!!!
Well, almost...
I knew my soap supplies from Brambleberry were coming today via Fed Ex, so I was SUUUUPER excited all day!!! :-D I even got up and did my run earlier than I usually do so I would be able to wash up and get started with my soaping when I was done. EEEEEEEE It's just like Christmas!!!
So 3 pm came, then 4, then 5... I kept looking out the front door like a kid looking for Santa Claus and wondering, "where is the Fed Ex guy with my boxes?!? I want my boxes!" I figured he forgot about me, so I went downstairs to the office to see if he left them there and they hadn't seen him yet. GRRR! I was starting to get so frustrated! FINALLY at 5:55 he knocked on the door, left the boxes, and ran away. It was like he KNEW I was waiting for him ALL day long and he was embarrassed and didn't want to face me. By the time my boxes finally came, I lost my motivation to work on my soaps today because I was frustrated... THANKS A LOT Mr. Fed Ex guy!
These supplies today are for my wedding favors I will be making. They are going to take me DAYS to complete, possibly even a week or more so I was really hoping to get started on them today because there are multiple steps that must be completed, then the pieces need to be cut... OYE!
Anyway, Guess I'll get started on them tomorrow! I'll post some pics as I'm working on them so you can get a sneak peek of what I'm working on. I won't post the finished products though because I want them to be a surprise for the wedding guests! Since there will most likely be extras because of the way I'm making them, I will be offering them for sale on my milehighbodycare etsy page after May 23!
By the way: All large soaps are STILL 50% off on BOTH of my etsy pages! Don't let these deals get away! The links are: carecreations and milehighbodycare. Once my carecreations page closes, I'm going to offer another special on my milehighbodycare page... Stay tuned!
Please support me by becoming a fan on facebook and invite all of your friends to become fans too!
And because pictures are fun to look at, here is a picture from Nov. 13, 2009. This was my FIRST attempt at two toned soap! They were apple scented. :-)

Ciao!
Subscribe to:
Posts (Atom)